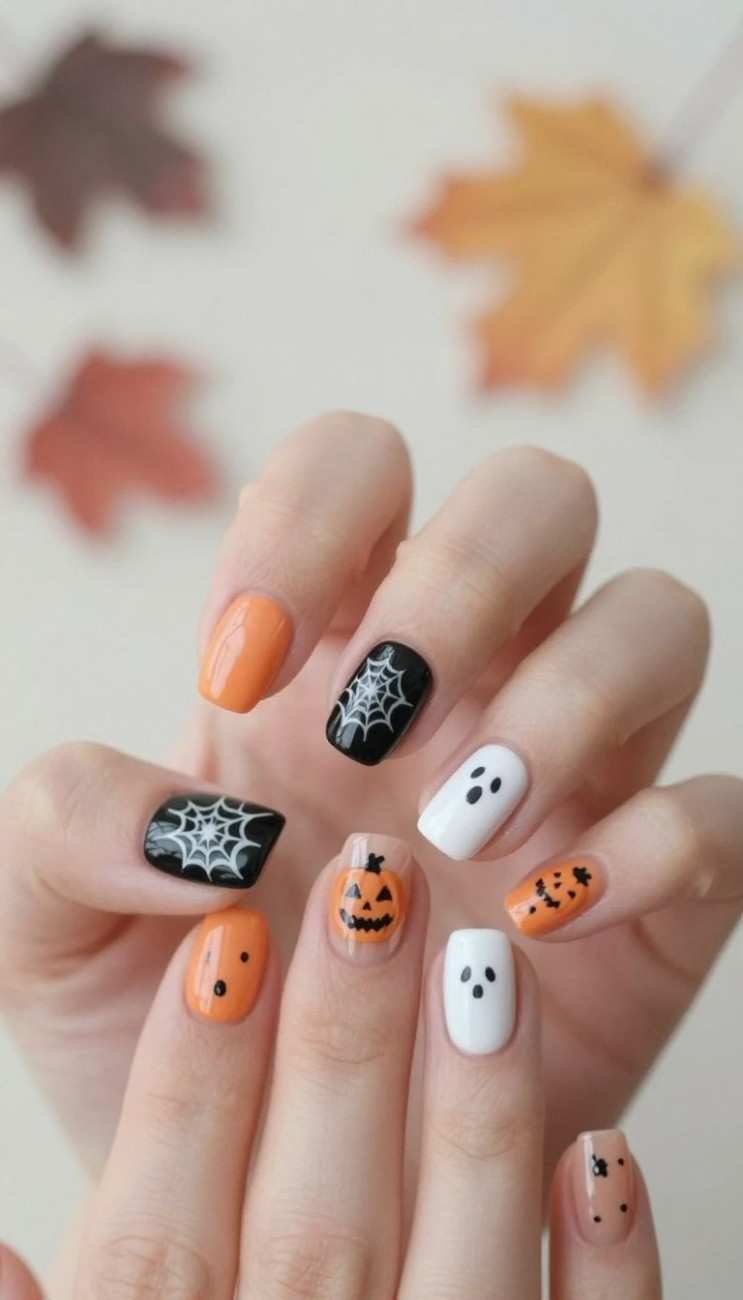
Getting ready for the spooky season does not mean you need an elaborate salon visit. Many people across the United States prefer a festive yet understated aesthetic that fits perfectly into a busy lifestyle. If you want to celebrate the holiday with a touch of charm, these ideas offer the perfect balance of style and ease.
This guide focuses on creating a polished appearance right at home. We will explore various techniques, from delicate symbols to chic neutral palettes that elevate your look without feeling overwhelming. Whether you love classic French tips or modern geometric shapes, you can achieve a professional finish with just a few basic tools.
Embrace the spirit of the season with designs that prioritize creativity and convenience. By choosing subtle accents, you ensure your manicure remains versatile enough for any occasion throughout October. Let us dive into these beginner-friendly methods to help you master your next seasonal transformation.
Key Takeaways
- Discover how to achieve a festive look using minimal effort and supplies.
- Learn to incorporate subtle seasonal symbols into your everyday manicure.
- Explore the benefits of using neutral color palettes for a sophisticated style.
- Master beginner-friendly techniques that provide a professional finish at home.
- Find inspiration for versatile designs that suit any occasion this October.
Why simple halloween nails work for a cute fall manicure
Simple Halloween nails offer a sophisticated way to celebrate the holiday without sacrificing your personal style. Many people find that the best seasonal manicures are those that balance festive flair with everyday wearability. By choosing easy halloween nail designs, you can enjoy a thematic look that feels polished rather than costume-heavy.
How minimal details create a spooky effect
You do not need full-coverage art to make a statement. Tiny, intentional motifs like a single ghost silhouette or a miniature bat can communicate the spirit of the season through limited visual details. These small accents provide a subtle spooky effect that catches the eye without overwhelming your overall aesthetic.
Using negative space is another great way to keep your manicure light and airy. By leaving parts of the natural nail visible, you ensure that even the most thematic symbols feel modern and clean. This approach makes it simple to incorporate seasonal icons while maintaining a minimalist vibe.
Choosing between cute, elegant, and playful Halloween styles
The beauty of these designs lies in their versatility. If you prefer a cute look, opt for soft pastel ghosts or tiny pumpkins with rounded edges. Those seeking an elegant finish might choose gold star accents or thin, black geometric lines that mimic spider webs.
For a more playful approach, consider mixing different icons across your nails. You can pair a small bat on one finger with a simple star on another. This variety keeps the manicure interesting while ensuring the easy halloween nail designs remain cohesive and fun.
Matching nail art to everyday outfits and occasions
One of the biggest advantages of a minimalist manicure is its ability to transition seamlessly between settings. These styles look just as appropriate in a professional office environment as they do at a weekend pumpkin patch or a festive party. You can easily pair them with your favorite cozy sweaters, denim, or even a sleek black dress.
Because the designs are understated, they do not clash with your daily wardrobe choices. You get the benefit of a festive touch that feels intentional and stylish. Ultimately, easy halloween nail designs allow you to express your love for the season while staying true to your personal fashion sense.
Simple halloween nails to try at home
Achieving a festive manicure at home is a fun way to celebrate the season. You can create quick halloween nail art without needing professional tools or years of experience. By focusing on simple shapes and limited color palettes, you can achieve a polished look that feels both spooky and stylish.
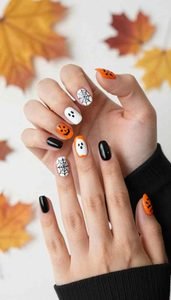
Single accent nails with tiny Halloween details
If you are new to nail art, starting with a single accent nail is the perfect strategy. This approach allows you to experiment with designs without the pressure of painting every finger.
Best motifs for beginners
Stick to simple shapes like tiny dots, small triangles for ghost eyes, or thin lines for spider legs. These basic forms are easy to execute with a toothpick or a small dotting tool.
How to keep accent art balanced
To maintain a clean look, place your design in the center of the nail or near the cuticle. Consistency is key, so try to keep the size of your motifs similar across both hands to ensure a balanced appearance.
Soft orange and black French tips
Upgrade your classic French manicure by swapping traditional white for seasonal colors. Use a thin brush to paint delicate orange or black tips for a subtle nod to the holiday.
Neutral nails with miniature spiders or stars
A neutral base color, such as beige or soft gray, provides a clean canvas for your art. Adding a single miniature spider or a few tiny stars creates a sophisticated, minimalist aesthetic that works for any occasion.
Mix-and-match designs for a coordinated manicure
You can create variety by alternating between solid colors and simple patterns on different fingers. By sticking to a cohesive color scheme, your quick halloween nail art will look intentional and well-coordinated rather than cluttered.
Tools, colors, and nail prep for easy Halloween nail designs
Preparing your workspace with the correct tools is the secret to a successful diy halloween manicure. Having everything organized before you start helps you stay focused and prevents smudges while your polish is still wet.
Essential polish shades for a minimalist Halloween palette
To keep your look clean and sophisticated, stick to a restrained color scheme. Classic black and crisp white are absolute must-haves for creating ghosts, spiderwebs, or lettering. You should also include a deep orange or a muted terracotta to capture the essence of the season without looking too bright.
Adding a sheer nude or a milky white base coat provides a professional canvas for your art. These neutral tones ensure that your spooky designs stand out clearly against the nail bed.
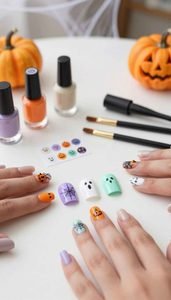
Useful tools for precise painted Halloween designs
The right equipment makes all the difference when you are working on small-scale art. You do not need expensive professional gear to get great results at home.
Detail brushes, dotting tools, and toothpicks
A thin, pointed detail brush is essential for drawing fine lines like spider legs or ghost outlines. If you do not have a dotting tool, a simple toothpick works perfectly for creating eyes or small stars. Consistency is key, so practice your strokes on a piece of paper before moving to your nails.
When nail stickers or stamping plates can save time
If you find freehand painting difficult, nail stickers are a fantastic alternative for a quick diy halloween manicure. Stamping plates also allow you to transfer intricate, perfect designs onto your nails in seconds. These tools are ideal for beginners who want a polished look without the stress of manual painting.
Preparing the nails for smoother, longer-lasting polish
Start by cleaning your nails with a bit of polish remover to eliminate natural oils. This simple step ensures that your base coat adheres properly to the nail surface. Always apply a high-quality base coat to protect your natural nails from staining, especially when using highly pigmented black or orange polishes.
Finish your design with a reliable top coat to seal in your hard work. A smooth top coat prevents chipping and gives your festive manicure a glossy, salon-quality shine that lasts for days.
Easy Halloween nail designs with ghosts, pumpkins, and bats
Bringing festive charm to your fingertips is simple when you focus on iconic Halloween shapes. You do not need to be a professional artist to create spooky nail ideas that look clean and intentional. By choosing one focal motif or mixing a few small symbols, you can achieve a polished look that celebrates the season without feeling cluttered.
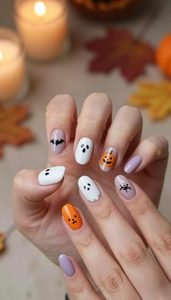
Ghost nails with simple white silhouettes
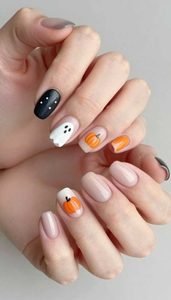
Ghost designs are a staple for a reason, as they offer a playful and lighthearted vibe. You can paint simple white blobs on a nude or dark base to create an instant seasonal look. These silhouettes are incredibly versatile and work well on any nail shape.
Creating expressive eyes and tiny mouths
To give your ghosts personality, use a fine-tip brush or a toothpick to add two small dots for eyes. A tiny curved line underneath creates a surprised or happy mouth. These minimalist facial features turn a basic shape into a character that feels cute rather than intimidating.
Mini pumpkin tips in orange and black
Pumpkins are another classic choice that brings warmth to your manicure. Instead of painting full gourds, try placing small orange dots near the tips of your nails. Use a thin black liner to add a tiny stem or a jagged mouth to complete the look.
Small bats that look delicate instead of dramatic
If you prefer a subtle approach, small bats are the perfect solution. Paint tiny “M” shapes in black polish to mimic the silhouette of wings in flight. Keeping these designs small ensures they look delicate and sophisticated rather than overwhelming.
Cute cobweb corners for a subtle spooky finish
Cobwebs add a touch of mystery to any set of nails. You can paint a simple web in the corner of one or two nails using a thin white or silver brush. This technique provides a subtle spooky finish that complements other designs without taking over the entire nail.
Glitter accents that add festivity without overwhelming the manicure
Finally, consider adding a touch of sparkle to tie your spooky nail ideas together. A light dusting of gold or silver glitter over a ghost or pumpkin adds a festive glow. Using glitter sparingly ensures your manicure remains elegant and perfect for any occasion.
Minimalist Halloween nails in neutral and muted colors
Halloween nails do not always have to be bright orange or neon green to make a statement. If you prefer a sophisticated aesthetic, shifting toward neutral and muted tones allows you to celebrate the season with subtle grace. These cute halloween nail tips help you maintain a polished look that transitions perfectly from the office to a festive evening out.
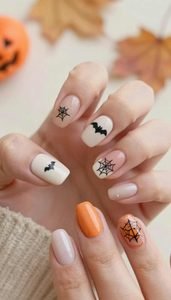
Sheer nude nails with black Halloween symbols
Sheer nude bases provide a clean, elegant canvas for minimalist art. By adding tiny black bats or stars, you create a high-contrast design that remains understated. This style is ideal for those who want a professional yet festive manicure.
Milky white nails with soft ghost details
Milky white polish offers a soft, dreamy quality that works beautifully for the fall season. You can paint tiny, translucent ghosts on one or two nails to keep the design light and airy. This approach feels modern and avoids the heavy look of traditional opaque white polish.
Brown, taupe, and terracotta combinations for fall
Embracing the colors of autumn is a fantastic way to ground your manicure. Using shades like warm taupe, deep brown, or earthy terracotta creates a cozy, seasonal vibe. These colors serve as a sophisticated alternative to standard holiday brights.
Muted green and burgundy accents for an unexpected look
If you want something unique, try incorporating muted sage green or deep, moody burgundy. These colors feel inherently autumnal and pair well with minimalist gold or black line art. They provide a rich, mature aesthetic that stands out without being overwhelming.
How to limit the palette to keep the design cohesive
To ensure your manicure looks intentional, stick to a maximum of three complementary colors. Choose one base shade and two accent colors that share similar undertones. This simple color strategy prevents the design from looking cluttered and keeps the focus on your chosen motifs.
Choosing glossy or matte finishes
The final texture of your polish can completely change the mood of your manicure. A high-shine glossy finish adds a classic, clean look that makes colors pop. Alternatively, a matte top coat provides a velvety, modern feel that makes muted colors look even more sophisticated.
Quick Halloween nail art for short and long nails
Whether your nails are short or long, you can easily master a festive nail tutorial to suit your style. The key to a great manicure lies in adjusting the scale and placement of your chosen symbols. By tailoring your approach to your specific nail shape, you ensure that every detail looks intentional and polished.
Simple designs that flatter short nails
Short nails look best when you keep the artwork minimal and centered. Instead of trying to fit a large scene on a small canvas, focus on single, bold motifs like a tiny ghost or a small star. Placing these designs near the cuticle or the tip helps elongate the appearance of the nail bed.
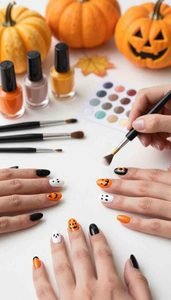
Using negative space on medium-length nails
Medium-length nails provide the perfect opportunity to experiment with negative space. By leaving parts of the natural nail visible, you prevent the design from feeling too heavy or crowded. Try painting a thin, spooky outline or a delicate cobweb that frames the bare nail for a sophisticated, modern look.
Adapting bats, ghosts, and French tips to long nails
Longer nails offer more surface area, which is ideal for creative French tip variations. You can easily transform a classic tip into a spooky scene by adding tiny bats or ghosts along the smile line. Consistency is vital here; keep your motifs spaced evenly to maintain a clean and balanced aesthetic across all ten fingers.
Making tiny motifs visible without adding clutter
When working with very small symbols, less is often more. To keep your art visible, use a fine-tipped brush to ensure your lines remain sharp and crisp. Following this festive nail tutorial will help you avoid over-decorating, ensuring that your spooky details stand out clearly against your base color.
DIY Halloween manicure steps for a polished result
Achieving the perfect DIY manicure requires a bit of patience and the right technique. When you focus on the details, you can easily create minimalist halloween nails that look like they were done by a professional.
Apply the base coat and create the background color
Start by cleaning your nail beds thoroughly to ensure a smooth surface. Always apply a high-quality base coat to protect your natural nails from discoloration.
Preventing staining from orange, red, and black polish
Dark or highly pigmented shades often leave behind stubborn stains. To avoid this, apply two thin layers of base coat before adding your chosen background color. This creates a protective barrier that keeps your nails looking healthy and clean.
Paint the largest shapes before the fine details
When designing your minimalist halloween nails, always map out the larger elements first. By placing the main shapes, such as a ghost or a pumpkin, you establish the composition of the design.
Fixing uneven lines and small mistakes
If you make a mistake, do not worry. Simply dip a thin, angled brush into a small amount of nail polish remover to clean up the edges. This precision cleaning allows you to sharpen your lines without ruining the entire manicure.
Add dots, outlines, and finishing accents
Once the base shapes are dry, use a dotting tool or a fine-tipped brush to add smaller details. These accents, such as tiny eyes or delicate cobweb lines, bring your design to life. Keep your movements steady and light to maintain a clean, minimalist aesthetic.
Seal the design with a careful top coat
The final step is to lock in your hard work with a clear top coat. Apply the polish in long, even strokes, being careful not to drag the brush over the wet art. A durable top coat will prevent smudging and ensure your festive look lasts throughout the season.
How to make spooky nail ideas last through Halloween
A beautiful set of nails deserves to stay pristine until the holiday ends. When you invest time in painted halloween designs, you want them to remain vibrant and smooth for as long as possible. Proper care ensures your festive look stays sharp throughout the entire season.
Drying techniques that reduce smudges and dents
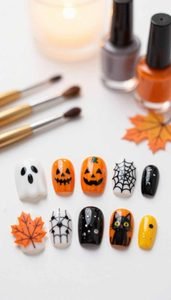
The secret to long-lasting painted halloween designs starts the moment you finish your final layer. Avoid using heat, as it can cause the polish to bubble or remain soft underneath. Instead, use a quick-dry top coat or a cooling spray to set the layers firmly.
Protecting the tips from chips and peeling
Your fingertips take the most abuse during daily tasks. To keep your painted halloween designs intact, apply a thin layer of top coat specifically along the free edge of the nail. This extra seal acts as a protective barrier against water and friction.
Refreshing the manicure with glitter or a new top coat
If you notice minor wear, you can easily revive your painted halloween designs without starting over. A fresh coat of clear polish can smooth out small scratches instantly. Adding a touch of glitter over worn tips is also a clever way to hide imperfections while adding extra sparkle.
Removing dark polish gently without drying the nails
When the holiday concludes, removing dark colors requires patience to avoid staining your skin. Use an acetone-free remover and hold a soaked cotton pad on the nail for thirty seconds before wiping. This method prevents the need for harsh scrubbing, which keeps your painted halloween designs from damaging the nail plate.
Simple aftercare for cuticles and natural nails
After removing your painted halloween designs, your nails need hydration to recover. Massage a high-quality cuticle oil into the nail bed to restore moisture and flexibility. Consistent hydration keeps your natural nails strong and ready for your next creative project.
Conclusions:
Creating a festive manicure is a simple way to celebrate the season without spending hours at a salon. You can achieve a polished look by focusing on clean shapes and a limited color palette. Whether you prefer subtle details or bold patterns, your nails serve as the perfect canvas for seasonal expression.
Versatile designs like ghost nails offer a playful touch that fits any nail length. You might choose tiny pumpkins, delicate bats, or classic French tips to match your personal wardrobe. These small symbols provide a festive flair that remains elegant for everyday wear.
Select one manageable design to start your creative journey today. Proper preparation ensures your art stays vibrant throughout the month. Experiment with different finishes to see what suits your style best. Your next manicure is a great opportunity to showcase your love for the season with confidence.
FAQs:
What are the best colors for creating simple halloween nails that look professional?
For a sophisticated look, stick to a palette of jet black, creamy white, and burnt orange. If you prefer minimalist halloween nails, try using neutral base shades like Essie’s “Topless & Barefoot” or a milky white like OPI’s “Funny Bunny.” These muted tones allow tiny painted halloween designs, like a single bat or a small star, to pop without looking cluttered.
How can I create ghost nails at home if I don’t have professional tools?
You don’t need a pro kit to master ghost nails! You can use the rounded end of a bobby pin or a toothpick to dot on white polish for the body. After it dries, use the tip of the toothpick to add two tiny black dots for eyes. It’s an easy halloween nail design that looks incredibly cute and takes less than five minutes per hand.
What is the secret to making a diy halloween manicure last through the holiday?
The key to longevity is all in the prep and the seal. Start with a high-quality base coat like Orly Bonder to prevent staining from dark oranges or blacks. Once your spooky nail ideas are dry, apply a thick layer of Seche Vite Dry Fast Top Coat. Be sure to “cap the edge” by running the brush along the very tip of your nail to prevent chipping during your Halloween festivities.
Are there any quick halloween nail art ideas for beginners with short nails?
Absolutely! Short nails look fantastic with festive nail tutorial classics like a “bloody” French tip or tiny “mummy” wraps using thin white lines. Another great option is a single accent nail featuring a minimalist pumpkin. Keeping the motifs small ensures they remain visible and balanced on a shorter canvas.
Where can I find cute halloween nail tips if I’m not confident in my painting skills?
If freehand painting feels intimidating, look for high-quality nail stickers or stamping plates from brands like Olive & June or Maniology. These allow you to achieve intricate painted halloween designs—like spiderwebs or detailed skeletons—with zero stress. Just peel, stick, and seal with a top coat for a perfect diy halloween manicure.
How do I choose between matte and glossy finishes for my spooky nail ideas?
It depends on the vibe you want! A glossy finish is classic and makes colors like vibrant orange really shine. However, a matte top coat, such as Sally Hansen’s Big Matte, can give minimalist halloween nails a modern, “velvety” look that feels a bit more moody and mysterious. Matte finishes are particularly striking on ghost nails or black cat silhouettes.
What are some quick halloween nail art designs that work for the office?
For a work-appropriate look, try soft orange and black French tips or a sheer nude base with a tiny black star on the ring finger. These easy halloween nail designs provide a festive nod to the season without being distracting. Using muted earth tones like terracotta or deep burgundy can also make your manicure feel seasonal yet professional.
Can I use regular acrylic paint for my festive nail tutorial designs?
Yes! Many enthusiasts of quick halloween nail art use water-based acrylic paint for fine details because it’s easier to wipe away mistakes with a damp cloth before it dries. Just ensure you apply a sturdy top coat over the finished painted halloween designs to lock the pigment in place and prevent it from washing off.